The Raspberry Pi is a single-board computer that is an excellent platform for network monitoring due to its cost-effectiveness, versatility, and portability. Originally designed as a low-cost computer, it soon became a go-to option for implementing custom IoT solutions.
There are many reasons to consider a Raspberry Pi network monitor. The platform is equipped with an Ethernet and a WiFi interface. It has sufficient compute power and RAM to run a Linux or Windows operating system. As a result, many network monitoring tools offers a Linux or Windows agent that can use the Raspberry Pi as a remote sensor.
To monitor network traffic with a Raspberry Pi device, you use open source applications like iperf, ntop, or perfSONAR. You can install commercial network monitoring tools like NetBeez. Here we will cover both options, and include at the end links to other articles that cover this platform.
Let’s dive into the world of Raspberry Pi and network performance monitoring.
Raspberry Pi Hardware Specifications
The Raspberry Pi device offers three main configurations that make this platform versatile for a wide range of use cases. Let’s review each Raspberry Pi configuration id details.
Model B – This is the original first model to come out and includes all the features and parts such as an Ethernet and Wi-Fi interface, USB ports, and GPIO. This version is the most suited as a Raspberry Pi network monitor.
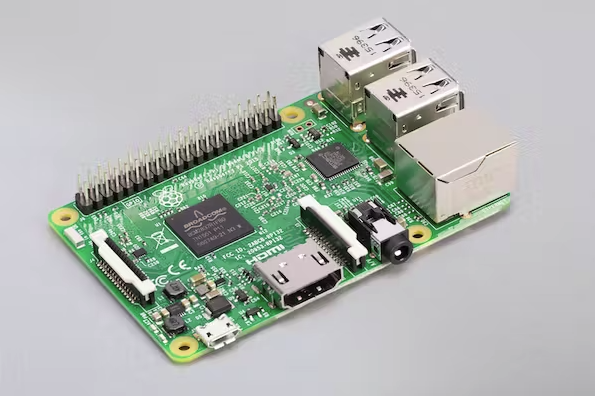
Model A – Has most of the features as a model B less the Ethernet network interface.
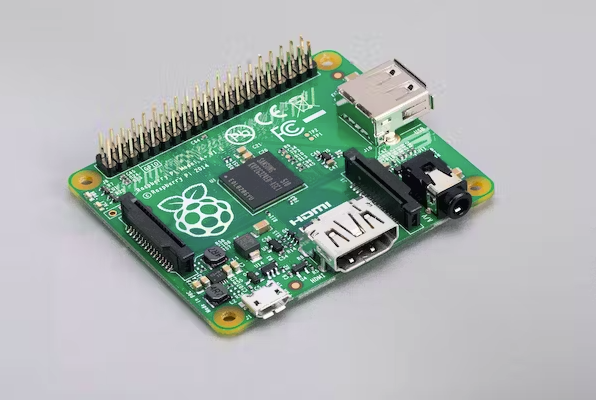
Pico and Zero – A smaller size model mostly with compute power and enough interfaces to make it a viable option for embedded systems.
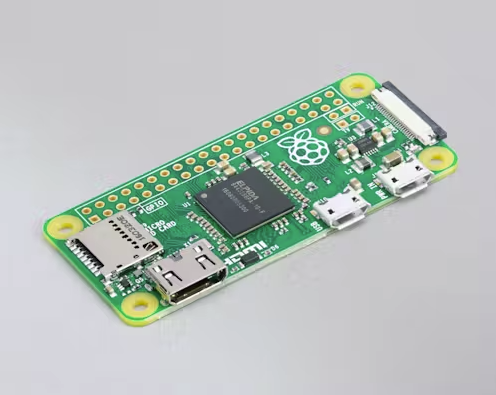
The Raspberry Pi model B is the best option for a network monitor agent as it includes an Ethernet interface and more compute power than other models. Where the Ethernet is not needed, the model A is also a good alternative. All three models are powered via micro USB connection.
Raspberry Pi Model B Versions
Since its launch in 2012, the Raspberry Pi foundation has released different versions, where the most recent is version 5. Let’s review the main differences between the different versions of the model B Raspberry Pi.
| Model | Version | CPU | RAM | Ethernet | Wi-Fi |
|---|---|---|---|---|---|
| B/B+ |
1 |
700 MHz ARM11 processor |
512 MB |
100 Base-T |
No |
|
2 |
Quad-core ARM Cortex-A7 CPU 0.9 GHz |
1 GB |
100 Base-T |
No | |
|
3 |
Quad Core 1.2GHz Broadcom BCM2837 64bit CPU |
1 GB |
100 Base-T |
BCM43438 wireless LAN (2.4GHz only) and Bluetooth Low Energy (BLE) | |
|
3 |
Broadcom BCM2837B0, Cortex-A53 (ARMv8) 64-bit SoC @ 1.4GHz |
1 GB |
Gigabit Ethernet over USB 2.0 (maximum throughput 300 Mbps) |
2.4GHz and 5GHz IEEE 802.11.b/g/n/ac wireless LAN, Bluetooth 4.2 (BLE) | |
|
4 |
quad-core Cortex-A72 (ARM v8) 64-bit SoC @ 1. 5GHz |
1,2,4, 8 GB |
Gigabit Ethernet |
2.4GHz and 5GHz IEEE 802.11.b/g/n/ac wireless LAN, Bluetooth 5.0 (BLE) | |
|
5 |
Broadcom BCM2712 2.4GHz quad-core 64-bit Arm Cortex-A76 CPU |
4, 8 GB |
Gigabit Ethernet, with PoE+ support (requires separate PoE+ HAT) |
2.4GHz and 5GHz IEEE 802.11.b/g/n/ac wireless LAN |
As referenced in the above table, the Raspberry Pi continued adding new capabilities and expanding its hardware specifications. Starting in version 3 it included a Wi-Fi adapter, in version 4 the Ethernet throughput increased from 300 Mbps to full Gigabit. In the latest version 5, it will also natively support Power-over-Ethernet (requires a separate board), which is a good alternative to the micro USB option.
Distributed Network Monitoring with Raspberry Pi
The benefit of the Raspberry Pi platform is that organizations can implement distributed network monitoring in a cost effective way by deploying network monitoring sensors all over the network. These sensors can also run Wi-Fi monitoring tests thanks to the WLAN adapter.
NetBeez is a network monitoring system that relies on remote agents to collect end-to-end, real-time performance data of enterprise and cloud networks. One of the main benefits of running a network monitoring system like NetBeez is that the configuration of the Raspberry Pi is very simple. Second, most open source tools are meant to run in a command line interface. Data is not saved or retained elsewhere. Moreover, they don’t have a graphic user interface that aggregates and displays telemetry data from many remote sensors to analyze and compare performance.

In NetBeez, each network monitoring sensor sends real-time network and application performance telemetry data to the network monitoring dashboard, which provides a centralized view into the overall network infrastructure. A network administrator can easily gain network visibility of a multi-site, highly distributed network infrastructure, without having to be physically present at each remote site.
Setting Up Raspberry Pi Network Monitoring
The process of installing a NetBeez agent on a Raspberry Pi so it can act as a network monitoring sensor is pretty trivial. As a requirement for this procedure, you’ll need a NetBeez dashboard, a Raspberry Pi, and a network connection. If you don’t have a NetBeez subscription, request a NetBeez 15-day free trial.
Step 1: Raspberry Pi setup
Follow this step-by-step procedure to install the NetBeez network monitoring system on your Raspberry Pi device:
- Collect your Raspberry Pi board, the SD card, and the power supply.
- Flash the SD card with the default Raspberry Pi OS operating system, which was previously called Raspbian OS; in alternative you can install an Ubuntu or Debian flavor.
- Insert the flashed SD card into the Raspberry P, plug the HDMI cable to your screen, keyboard, and the power supply.
- Login to the operating system (you can also do via an ssh connection); make sure that you have an internet connection either via an Ethernet cable or the wireless network.
- Download the setup script from the NetBeez repositories:
curl -L -O https://raw.githubusercontent.com/netbeez/agent-installation/master/agent_setup.sh
- Execute the setup script including your unique secret key (which is provided in the NetBeez dashboard):
sudo bash agent_setup.sh --modify-interface --secret=<secret_key>
- Once the setup script completes, you will see the Raspberry Pi network monitoring on your NetBeez dashboard as an agent.
Follow this alternative guide if you want to monitor WiFi with Raspberry Pi.
Step 2: Configure the Raspberry Pi network monitoring tests
Once the network monitoring software is installed, the Raspberry Pi will connect to the NetBeez network monitoring dashboard. One of the benefits of NetBeez is that it offers a Raspberry Pi network monitoring dashboard to monitor network traffic performance. In the following screenshot, you can see that this agent is connected to the network with an Ethernet cable and that it runs Raspbian as the Raspberry Pi OS.
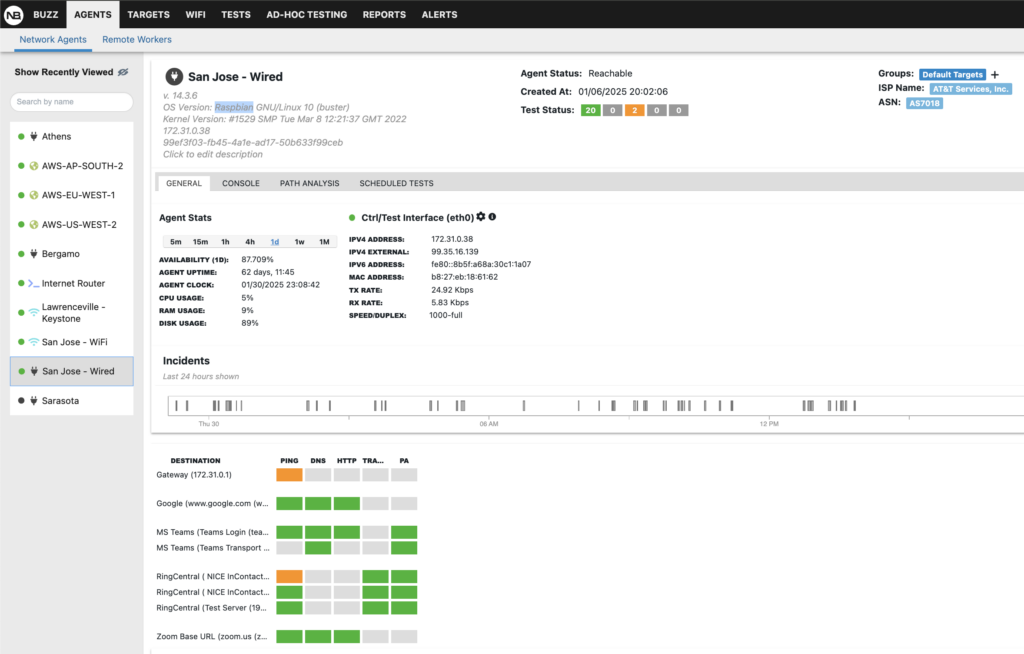
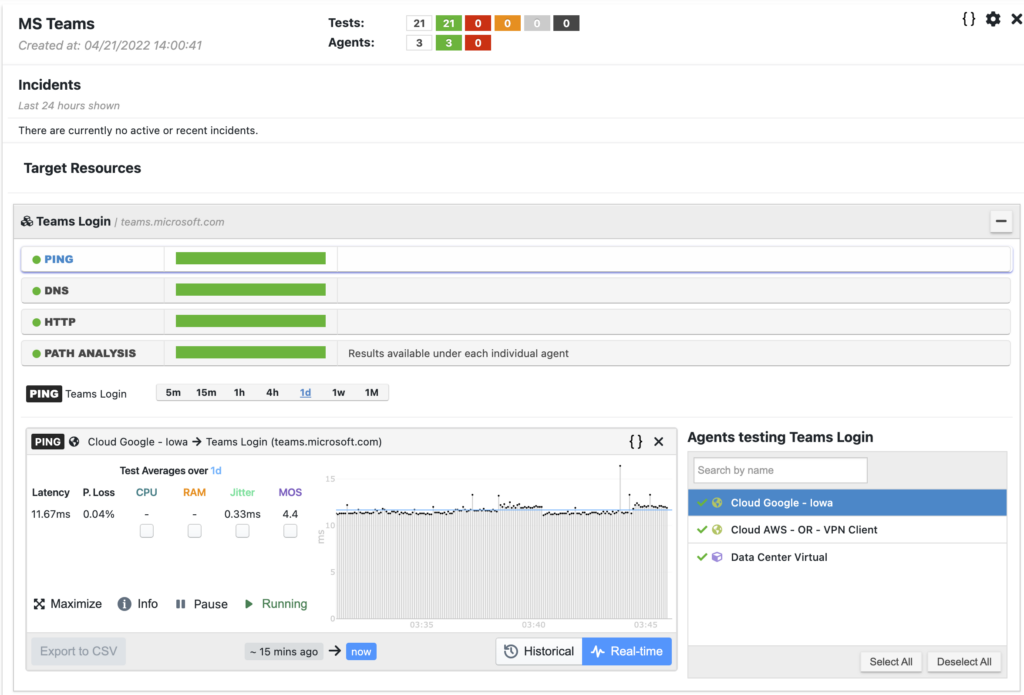
NetBeez offers two ways for network and application monitoring: targets and scheduled tests.
Targets are web or SaaS applications monitored via continuous network monitoring tests such as ping, DNS, HTTP, traceroute and path analysis. These tests run at regular intervals, down to every second if needed, providing real-time and historical performance data on internet connectivity and more. Performance metrics such as latency, packet loss, DNS resolution time and HTTP loading time are crucial for proactive detecting intermittent or complete loss of connectivity. For example the following screenshot report a target to MS Teams.
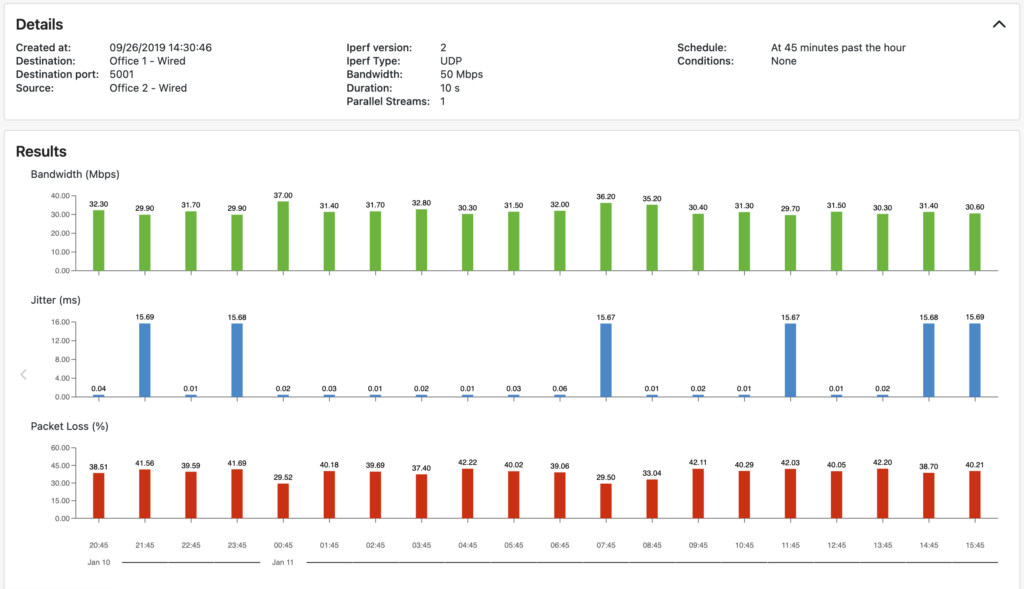
Scheduled tests like iperf, speed test, and VoIP, provide network performance metrics such as download and upload speed against internet servers and cloud locations. These tests run according to a user-defined schedule, such as hourly or daily based on needs. In the following screenshot an iperf test reports throughput, packet loss, and jitter.
Step 3: Configure alerts and notifications methods
The last important step of the configuration is to enable notifications when NetBeez finds anomalies in the network. By default, NetBeez generates alerts either when a target detects a loss of connectivity with ping, or a service interruption with DNS and HTTP.
NetBeez also supports performance alerts by comparing a short-term moving average with a fixed value or to a long-term baseline. This simplifies SLA enforcements or smart detection of performance degradation. Notifications enable network administrators and support teams to get an email or some other events when an alert is triggered.
NetBeez can send notifications via standard protocols such as SMTP, SNMP, Syslog, and webhooks. It also supports out-of-the-box integrations with third-party systems such as ServiceNow, MS Teams, Slack, and PagerDuty.
Utilizing Raspberry Pi for Real-Time Monitoring
A Raspberry Pi running Linux has access to a wide list of command line utilities that help collect network metrics. The most commonly used are:
- Ping to gather end-to-end connectivity, round-trip time, and packet loss
- Traceroute to map the underlying network topology on a hop by hop basis
- MTR is a similar tool like traceroute, but in addition to providing packet loss for each hop
- Iperf is the go-to tool to run throughput measurements via TCP or UDP connections
At the same time, there are also open source network monitoring solutions that bring all these utilities together, including a graphical user interface and data retention:
- PerfSONAR which is a suite of tools that provide a minimal user interface web-based
- Nagios is a widely used open-source network monitoring tool that provides plugins and add-ons that can use a Raspberry Pi as a network monitoring sensor
Troubleshooting Common Network Issues with Raspberry Pi
Troubleshooting common network issues helps identifying and addressing the root causes of network failures. This task is crucial for maintaining a stable and efficient network, ensuring seamless data transmission, and ultimately preventing disruptions that could impact both individual users and overall organizational performance. Swift and effective measures, such as troubleshooting network issues and restoring connectivity, are crucial to minimizing the impact of such disruptions and ensuring a seamless return to normal operations.
Let’s see how NetBeez and the Raspberry Pi can work together to help organizations deal with Internet connectivity issues and more.
Complete loss of connectivity
In the unfortunate event of a complete loss of connectivity, users find themselves unable to access essential online services, communication channels are severed, and productivity grinds to a halt. Critical business operations are disrupted, and the inability to connect with servers or cloud resources impedes data sharing and collaboration. This loss of connectivity not only affects individual users but also has cascading effects on organizational workflows, potentially leading to financial repercussions and reputational damage.

Intermittent packet loss
Intermittent packet loss introduces a disruptive element into network communication, causing data transmission to be inconsistent and unpredictable. This phenomenon occurs when packets of information fail to reach their destination intermittently, leading to delays, disruptions, and potential data corruption. The impact is evident in degraded audio and video quality, slow-loading web pages, and interruptions in online activities. This erratic loss of packets hampers the reliability of network-dependent applications and services, adversely affecting user experience.

Performance degradation in waves
Performance degradation in waves manifests as a cyclical ebb and flow of efficiency within a network or system. Users may experience intermittent periods of reduced speed, latency, or responsiveness, creating a fluctuating and frustrating user experience. This recurring pattern of performance dips can impact the seamless functioning of applications, leading to slower load times, disrupted streaming, and overall diminished productivity.

Frequent jittery behavior
Frequent jittery behavior in a network characterizes an unsettling scenario where data packets encounter erratic delays during transmission. This results in a jittery and inconsistent user experience, particularly noticeable in real-time applications like video conferencing or online gaming. The frequent disruptions can lead to distorted audio, pixelated video streams, and overall diminished quality.
Conclusion on Raspberry Pi Network Monitoring
The Raspberry Pi’s cost-effectiveness, small footprint, and network capabilities position it ideally for real-time network monitoring. Utilize it as a sensor with open-source tools such as iperf or opt for a commercial solution like NetBeez, providing straightforward setup, customizable tests like ping and traceroute, and automatic alerts for unusual network behavior. The Model B is the best suited for building a Raspberry Pi network monitor, recognized for its processing power and Gigabit Ethernet, to oversee network performance and address issues like connectivity loss, packet loss, or performance degradation. With a Raspberry Pi network monitoring tool, maintaining a robust and budget-friendly network has never been easier.
Raspberry Pi related articles
- Run iperf on Raspberry Pi
- Performance comparison with other single-board computers
- Raspberry Pi alternatives
- Comparison of iperf performance on WiFi on Raspberry Pi using an external WiFi interface with other single-board computers
- Turn a Raspberry Pi network monitor sensor for wireless networks
- Raspberry Pi setup with WPA supplicant
- Instructions on how to install NetBeez Debian package


