What is iperf?
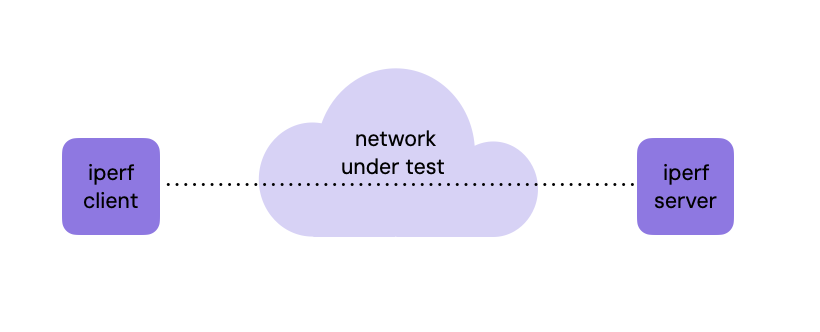
Iperf is an open source network performance measurement tool that tests throughput in IP networks. To do so, it generates network traffic from one host, the iperf client, to another, the iperf server. Iperf not only measures the amount of traffic that is transferred, but also report performance metrics such as latency, packet loss, and jitter. This network performance management tool works for both TCP and UDP traffic with certain nuances that pertain to the specifics of each protocol. In UDP mode it can also generate multicast traffic.
Iperf Versions
There are two versions of iperf which are being developed in parallel: version 2 and version 3. Version 2 is the original iperf project that was developed by the National Laboratory for Applied Network Research. The source code was made available under a BSD license. Successively, ESNET (Energy Science Network) along with the Lawrence Berkeley National Laboratory developed a new version (version 3) that is not compatible with the original iperf tool. Worth noting that both versions have similar set of functionalities and they are both available under a BSD license.
Iperf version 2 was released in 2003 from the ground of the original iperf, and it’s currently in version 2.2.1. Iperf version 3 was released in 2014 and it’s current version is 3.18. Iperf3 is a rewrite of the tool in order to produce a simpler and smaller code base. The team that has taken the lead in iperf2 development is mainly focused on WiFi testing, while iperf3 is focused on research networks. However, most of their functionality overlaps, and they can be both used for general network performance and testing.
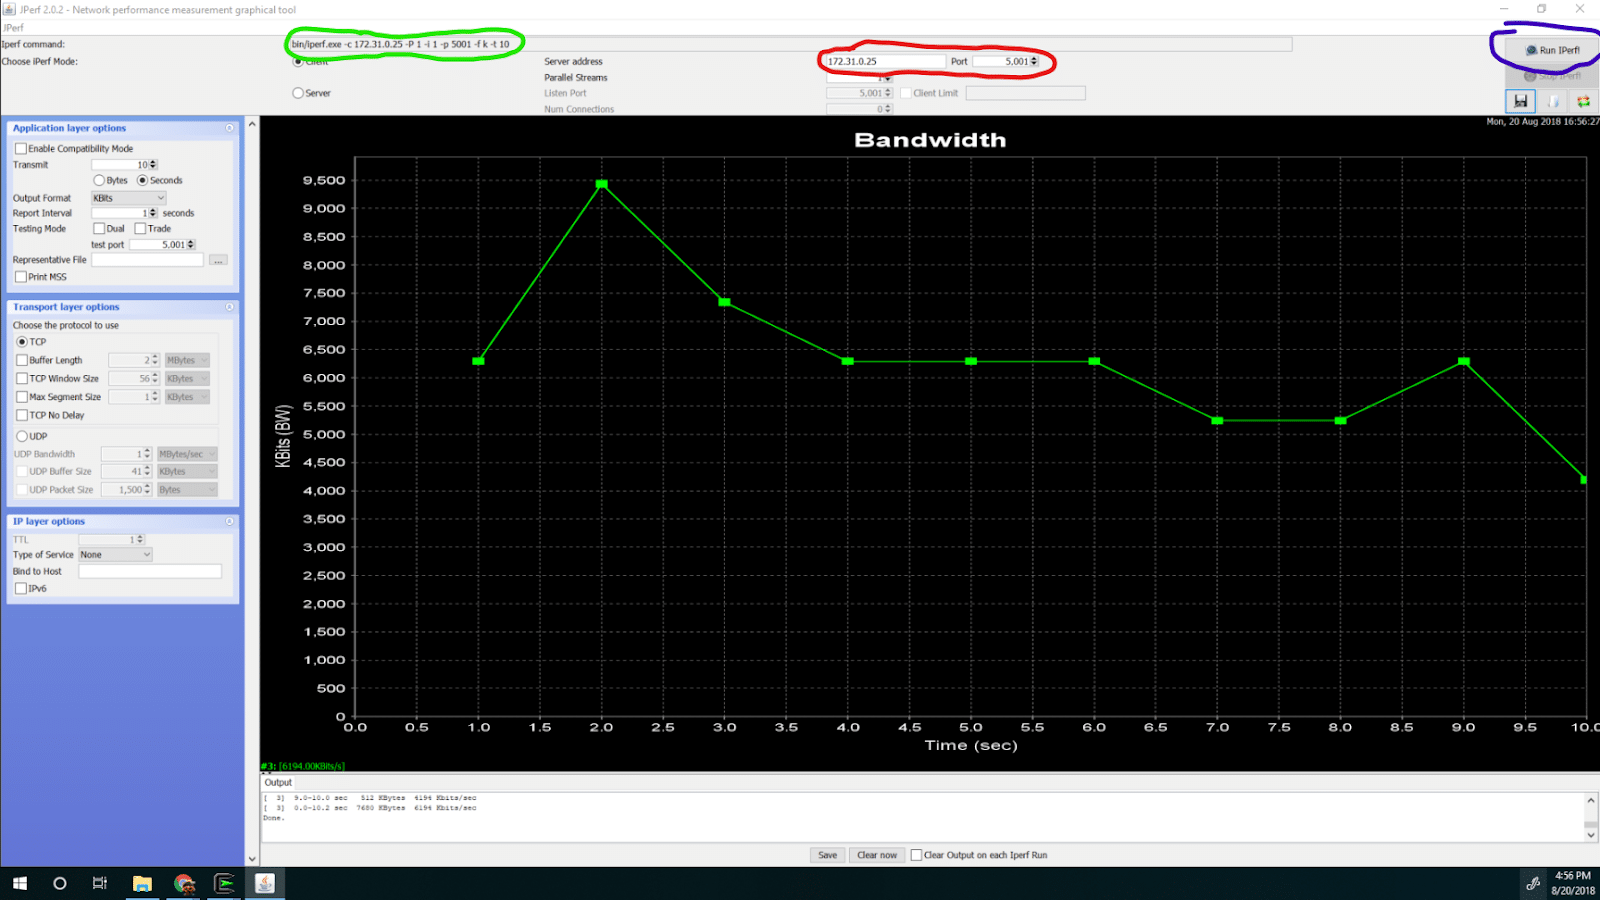
Both versions support a wide variety of platforms, including Linux, Windows, and MAC OS. There is also a GUI version of iperf2 based in Java, called jperf. One subtle difference between the two version is the way they use the reverse option flag, how traffic is exchanged, and the default ports they use. I invite you to read the blog post I wrote to learn more about jperf.
Usage
In iperf, the host that sends the traffic is called client and the host that receives traffic is called server. Here is how the command line output looks for the two versions and for UDP and TCP tests, at their basic forms without any advanced options. Important to note is that in version 2, the default port where the server is listening is 5001 for both TCP and UDP protocols, while in version 3, the default port where the server is listening is 5201 for both protocols.
TCP
To run the iperf2 server using the Transmission Control Protocol, use the flag -s (iperf -s):
$ iperf -s
------------------------------------------------------------
Server listening on TCP port 5001
TCP window size: 85.3 KByte (default)
------------------------------------------------------------
[  4] local 172.31.0.25 port 5001 connected with 172.31.0.17 port 55082
[ ID] Interval       Transfer     Bandwidth
[  4]  0.0-10.0 sec  1.09 GBytes   939 Mbits/sec
To run the iperf2 in client mode use the flag -c followed by the server’s IP address:
$ iperf -c 172.31.0.25
------------------------------------------------------------
Client connecting to 172.31.0.25, TCP port 5001
TCP window size: 85.0 KByte (default)
------------------------------------------------------------
[  3] local 172.31.0.17 port 55082 connected with 172.31.0.25 port 5001
[ ID] Interval       Transfer     Bandwidth
[  3]  0.0-10.0 sec  1.09 GBytes   940 Mbits/sec
Similarly, to run the iperf3 server use the flag -s (iperf3 -s):
$ iperf3 -s
-----------------------------------------------------------
Server listening on 5201
-----------------------------------------------------------
Accepted connection from 172.31.0.17, port 56342
[  5] local 172.31.0.25 port 5201 connected to 172.31.0.17 port 56344
[ ID] Interval           Transfer     Bandwidth
[  5]   0.00-1.00   sec   108 MBytes   907 Mbits/sec
[  5]   1.00-2.00   sec   112 MBytes   941 Mbits/sec
...
[  5]   9.00-10.00  sec   112 MBytes   941 Mbits/sec
[  5]  10.00-10.04  sec  4.21 MBytes   934 Mbits/sec
- - - - - - - - - - - - - - - - - - - - - - - - -
[ ID] Interval           Transfer     Bandwidth       Retr
[  5]   0.00-10.04  sec  1.10 GBytes   938 Mbits/sec    0    sender
[  5]   0.00-10.04  sec  1.10 GBytes   938 Mbits/sec         receiver
To run the iperf3 client use the flag -c followed by the server’s IP address (iperf3 -c <client_IP>):
$ iperf3 -c 172.31.0.25
Connecting to host 172.31.0.25, port 5201
[  4] local 172.31.0.17 port 56344 connected to 172.31.0.25 port 5201
[ ID] Interval           Transfer     Bandwidth       Retr  Cwnd
[  4]   0.00-1.00   sec   112 MBytes   943 Mbits/sec    0    139 KBytes
[  4]   1.00-2.00   sec   112 MBytes   941 Mbits/sec    0    139 KBytes
...
[  4]   8.00-9.00   sec   112 MBytes   941 Mbits/sec    0    223 KBytes
[  4]   9.00-10.00  sec   112 MBytes   941 Mbits/sec    0    223 KBytes
- - - - - - - - - - - - - - - - - - - - - - - - -
[ ID] Interval           Transfer     Bandwidth       Retr
[  4]   0.00-10.00  sec  1.10 GBytes   941 Mbits/sec    0    sender
[  4]   0.00-10.00  sec  1.10 GBytes   941 Mbits/sec         receiver
iperf Done.
UDP
To run the iperf2 server using the User Datagram Protocol you must add the flag -u that stands for UDP (iperf -s -u):
$ iperf -s -u
------------------------------------------------------------
Server listening on UDP port 5001
Receiving 1470 byte datagrams
UDP buffer size:  208 KByte (default)
------------------------------------------------------------
[  3] local 172.31.0.25 port 5001 connected with 172.31.0.17 port 54581
[ ID] Interval       Transfer     Bandwidth        Jitter   Lost/Total Datagrams
[  3]  0.0-10.0 sec  1.25 MBytes  1.05 Mbits/sec   0.022 ms    0/  893 (0%)
Same for the iperf2 client that needs the flag -u to specify that it’s an UDP test (iperf -c <client_IP> -u):
$ iperf -c 172.31.0.25 -u
------------------------------------------------------------
Client connecting to 172.31.0.25, UDP port 5001
Sending 1470 byte datagrams
UDP buffer size:  208 KByte (default)
------------------------------------------------------------
[  3] local 172.31.0.17 port 54581 connected with 172.31.0.25 port 5001
[ ID] Interval       Transfer     Bandwidth
[  3]  0.0-10.0 sec  1.25 MBytes  1.05 Mbits/sec
[  3] Sent 893 datagrams
[  3] Server Report:
[  3]  0.0-10.0 sec  1.25 MBytes  1.05 Mbits/sec   0.022 ms    0/  893 (0%)
In iperf3 the server only needs the flag -s (iperf3 -s):
$ iperf3 -s
-----------------------------------------------------------
Server listening on 5201
-----------------------------------------------------------
Accepted connection from 172.31.0.17, port 56346
[  5] local 172.31.0.25 port 5201 connected to 172.31.0.17 port 51171
[ ID] Interval           Transfer     Bandwidth       Jitter    Lost/Total Datagrams
[  5]   0.00-1.00   sec   120 KBytes   983 Kbits/sec  1882.559 ms  0/15 (0%)
[  5]   1.00-2.00   sec   128 KBytes  1.05 Mbits/sec  670.381 ms  0/16 (0%)
...
[  5]   9.00-10.00  sec   128 KBytes  1.05 Mbits/sec  0.258 ms  0/16 (0%)
[  5]  10.00-10.04  sec  0.00 Bytes  0.00 bits/sec  0.258 ms  0/0 (-nan%)
- - - - - - - - - - - - - - - - - - - - - - - - -
[ ID] Interval           Transfer     Bandwidth       Jitter    Lost/Total Datagrams
[  5]   0.00-10.04  sec  1.25 MBytes  1.04 Mbits/sec  0.258 ms  0/159 (0%)
The iperf3 client will need to use the flag -u to select UDP as testing protocol (iperf3 -c <client_IP> -u):
$ iperf3 -c 172.31.0.25 -u
Connecting to host 172.31.0.25, port 5201
[  4] local 172.31.0.17 port 51171 connected to 172.31.0.25 port 5201
[ ID] Interval           Transfer     Bandwidth       Total Datagrams
[  4]   0.00-1.00   sec   128 KBytes  1.05 Mbits/sec  16
[  4]   1.00-2.00   sec   128 KBytes  1.05 Mbits/sec  16
...
[  4]   8.00-9.00   sec   128 KBytes  1.05 Mbits/sec  16
[  4]   9.00-10.00  sec   128 KBytes  1.05 Mbits/sec  16
- - - - - - - - - - - - - - - - - - - - - - - - -
[ ID] Interval           Transfer     Bandwidth       Jitter    Lost/Total Datagrams
[  4]   0.00-10.00  sec  1.25 MBytes  1.05 Mbits/sec  0.258 ms  0/159 (0%)
[  4] Sent 159 datagrams
iperf Done.
As you can see, the output format is very similar and both versions gave the same measurements in this example. In the above output we also enabled the periodic bandwidth reports by using the -i flag.
To conclude, the differences between TCP and UDP tests are the following:
- TCP tests try to generate as much network throughput as possible while UDP by default are capped to 1Mbps
- UDP tests report the datagram loss while TCP report the TCP retransmissions
- UDP tests report delay jitter while TCP don’t
Common Iperf Options
| Option | Description |
|---|---|
| -p, –port n | The server port for the server to listen on and the client to connect to. |
| -f, –format [kmKM] | A letter specifying the format to print bandwidth numbers in. Supported formats: ‘k’ = Kbits/sec ‘K’ = KBytes/sec ‘m’ = Mbits/sec ‘M’ = MBytes/sec. |
| -i, –interval n | Sets the interval time in seconds between periodic bandwidth reports. If this value is set to zero, no interval reports are printed. Default is zero. |
| -B, –bind host | Bind to host, one of this machine’s addresses. For the client this sets the outbound interface. For a server this sets the incoming interface. |
| -v, –version | Show version information and quit. |
| -D, –daemon | Run the server in background as a daemon. |
| -b, –bandwidth n[KM] | Set target bandwidth to n bits/sec (default 1 Mbit/sec for UDP, unlimited for TCP). If there are multiple streams (-P flag), the bandwidth limit is applied separately to each stream. |
| -t, –time n | The time in seconds to transmit for. iPerf normally works by repeatedly sending an array of len bytes for time seconds. Default is 10 seconds. See also the -l, -k and -n options. |
| -n, –num n[KM] | The number of buffers to transmit. Normally, iPerf sends for 10 seconds. The -n option overrides this and sends an array of len bytes num times, no matter how long that takes. See also the -l, -k and -t options. |
| -P n | Number of parallel client threads to run. |
Advanced iperf capabilities
Iperf offers several advanced configuration options to manipulate the test traffic generated. For example, users can run multiple simultaneous connections, change the default TCP window size, or even run multicast traffic when in UDP mode.
Multiple simultaneous connections
iperf2 has the capability to facilitate multiple connections concurrently, making it a preferred choice for assessing concurrent network throughput from multiple clients to a single sever. With iperf2, users can establish multiple client-server connections simultaneously, enabling comprehensive testing scenarios that closely simulate real-world network conditions of IP networks. This ability to handle multiple connections efficiently empowers users to evaluate network performance under diverse loads, such as concurrent data transfers or simultaneous user activities, and estimate the maximum achievable bandwidth.
Parallel connections
In alternative to simultaneous connections from different clients, iperf also supports parallel threads from the same client. By using the -P option followed by the number of parallel threads, network testers can ensure to maximize the network throughput across a single link.
Manipulating the TCP window size
Understanding TCP window size is crucial for accurate iperf measurements. This setting, adjustable via the -w flag, controls the amount of data sent before waiting for an acknowledgment. Larger windows (set with -w) can boost network throughput, especially on high-latency networks. However, limitations exist: operating systems restrict window size, and overly large settings can overwhelm the receiver, leading to inaccurate results. Finding the optimal window size involves balancing performance and resource usage. Experimenting with different -w values helps reveal your network’s true performance capabilities.
NetBeez and Iperf
The NetBeez is a network performance measurement solution for IP networks. One of the tools available for testing network throughput in NetBeez is iperf. It supports both versions 2 and 3, and both protocols TCP and UDP. One of the primary benefits of using NetBeez, versus the regular iperf, is to schedule period tests without having to manually run those.
Via the NetBeez dashboard the user can configure iperf tests which are then run by the NetBeez agents. The NetBeez agents can be hardware, software, or virtual appliances. This includes cloud instances, Linux, Windows, and Mac OS machines. NetBeez can run iperf tests between two NetBeez agents or between one or more NetBeez agents, which act as iperf clients, and an external iperf server.
NetBeez supports two ways to run iperf tests: ad-hoc when needed and scheduled for continuous monitoring and testing. If you want to test NetBeez request a demo or start a trial.

Ad-Hoc Tests
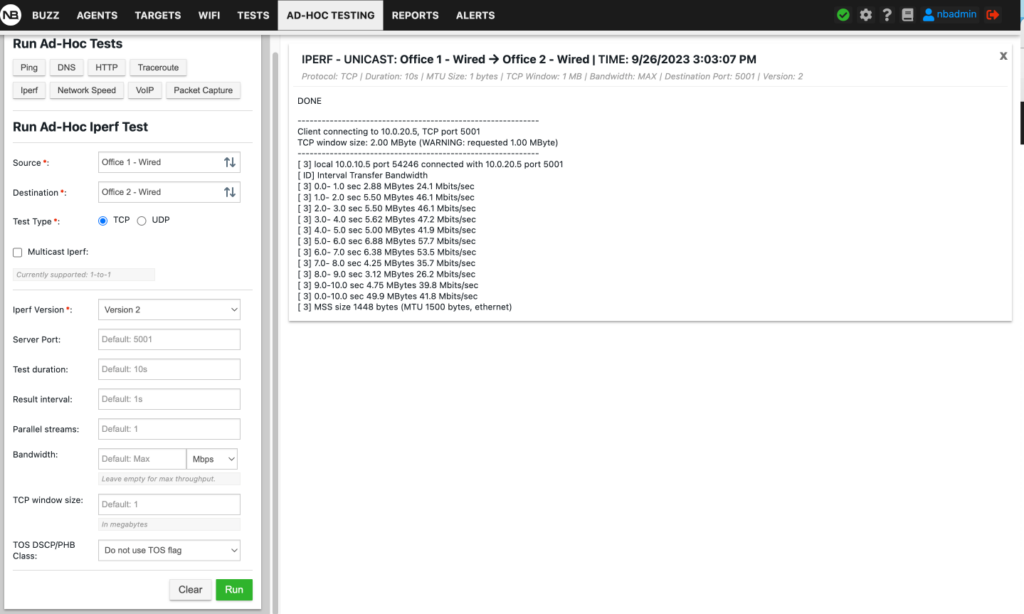
The Ad-Hoc testing enables you to run spontaneous one-off tests between two selected agent or between an agent and an iperf server. You can view results from multiple tests and multiple types of tests, allowing for easy viewing, comparison, and troubleshooting. The following screenshot shows an ad-hoc iperf tests running between two wired agents based on Raspberry Pi with periodic bandwidth reports every second by default.
Scheduled Tests
NetBeez provides a simple way to run iperf to estimate network bandwidth. Tests can be scheduled to run at a user-defined intervals. During the configuration of a test, the user can pick different options, such as:
- Support for iperf2 and iperf3 tests
- Support for TCP or UDP tests, including multicast
- Mode: agent to agent or agents to server
- Definition of number of parallel flows, bandwidth, and TCP maximum segment size
- Type of Service marking
- TCP/UDP port used
- Test duration
- Run schedule
- Conditions upon which the test results are marked
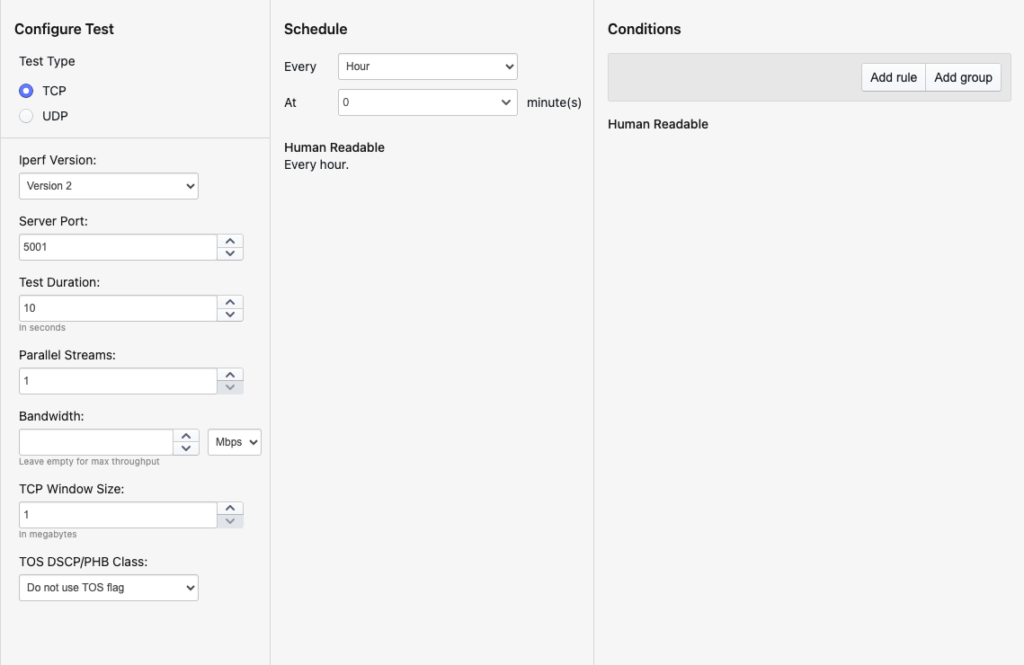
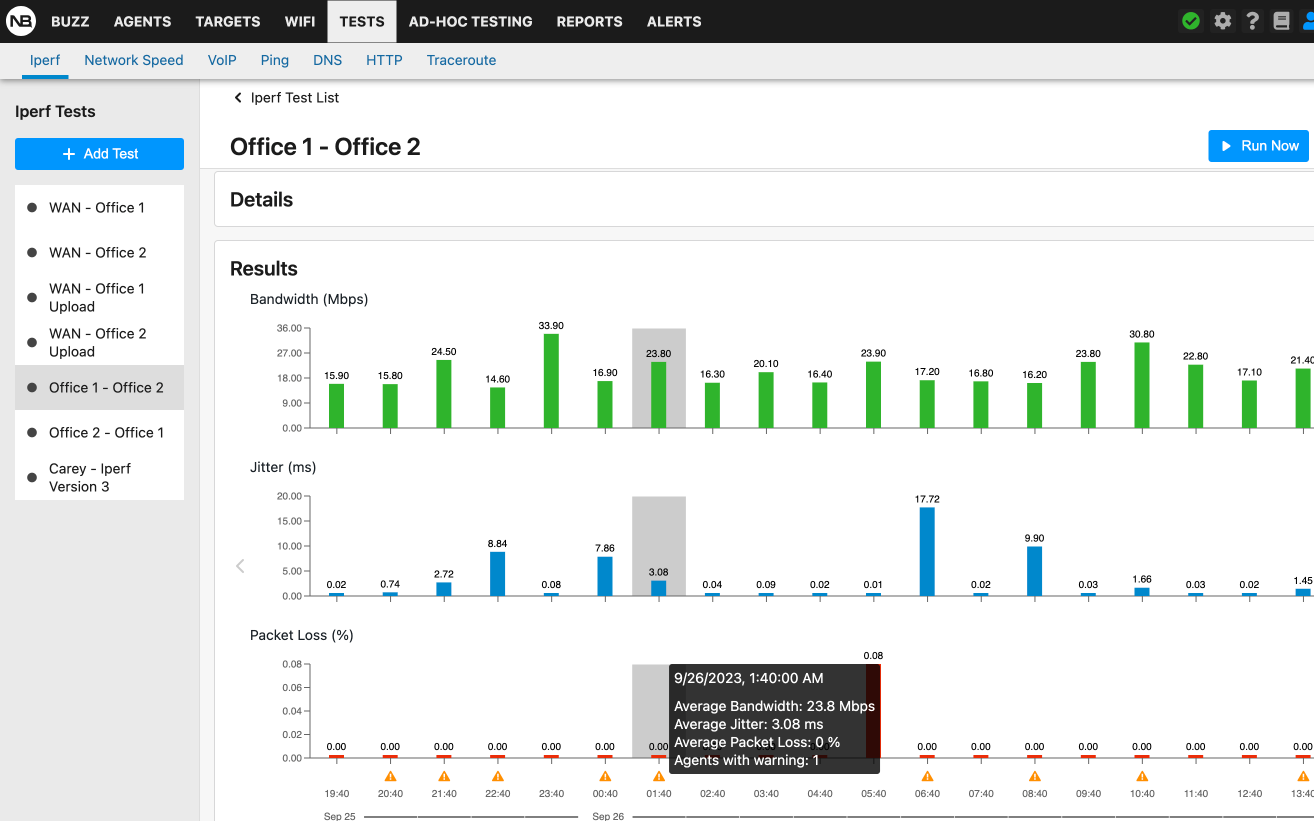
The user can then review the historical data about the configured tests including the test conditions that were crossed. Not only NetBeez allows to automatically run iperf tests, but also to develop a performance baseline, highlight when throughput is reduced, and generate reports.
In the following screenshot, you can see the results of an iperf test that reports the UDP bandwidth, delay jitter, and datagram loss.
If you want to automatically orchestrate iperf tests at scale, check out NetBeez and request a demo. NetBeez supports both iperf versions and many options covered in this article. As a result, NetBeez is an excellent solution for measuring network bandwidth, packet loss, and more.


