Monitoring Zoom video conferencing to proactively detect and troubleshoot performance issues is vital for ensuring quality meetings and employees’ productivity. This article will provide a detailed analysis for dealing with Zoom performance issues, offering an in-depth coverage of specific monitoring techniques and tools available. We will also review how Zoom’s own monitoring and reporting features are often overlooked.The article covers the following topics:
- How do you monitor Zoom?
- Benefits of Zoom monitoring
- A simple guide to monitor Zoom
- What is Zoom troubleshooting?
- Best practices for Zoom
- Takeaways from Zoom monitoring and troubleshooting
How do you monitor Zoom?
Zoom monitoring is the process of tracking and analyzing the performance and availability of Zoom meetings, webinars, and other video communication sessions. This can be done using a variety of tools and methods, including:
- Zoom’s built-in monitoring tools: Zoom provides a number of built-in monitoring tools that track metrics such as endpoint performance, network statistics, and more.
- Third-party Zoom monitoring tools: There are also a number of third-party Zoom monitoring tools available, which offer more advanced features such as real-time alerts, historical reporting, and detailed analytics. NetBeez provides a predefined set of tests that monitor Zoom performance.
What metrics should be included when monitoring Zoom?
- CPU usage Is the percentage of time that a computer’s central processing unit (CPU) is busy executing instructions. CPU usage is an important metric for monitoring computer performance, as high CPU usage can lead to slowdowns and other performance problems.
- RAM consumption is the amount of random access memory (RAM) that a computer is using at a given time. RAM stores data that CPU and applications need to run. High RAM consumption can lead to low memory conditions, which can cause applications to crash or become unresponsive.
- Packet loss is the percentage of data packets that are lost or corrupted during transmission. Packet loss can be caused by a variety of factors, such as network congestion, hardware failures, and software bugs. Packet loss can lead to poor performance for applications that rely on real-time data transmission, such as video streaming and online gaming.
- Latency is the time it takes for a data packet to travel from one point on a network to another. Latency is measured in milliseconds (ms). High latency can lead to slow response times for applications and services.
- Jitter is the variation in latency over time. A variety of factors contribute to jitter, such as network congestion and hardware limitations. Jitter can lead to poor quality of service for applications that are sensitive to latency, such as voice over IP (VoIP) and video streaming.
| Zoom Performance Metric | Recommended Value | Degraded Value |
|---|---|---|
| Jitter | Less than 30 ms. | More than 40 ms. |
| Latency | Less than 100 ms. | More than 150 ms. |
| Packet Loss | Less than 2% | More than 10% |
Benefits of Zoom monitoring
Zoom monitoring can be used for a variety of purposes, such as:
- Ensuring the quality of service: Zoom monitoring can help to identify and resolve any issues that may be impacting the quality of Zoom meetings and webinars. This can help to improve the overall experience for participants and ensure that meetings and webinars are conducted smoothly and efficiently.
- Troubleshooting problems: If participants are experiencing problems with Zoom, Zoom monitoring can help to identify the root cause of the problem. This can help to speed up the troubleshooting process and get participants back on track quickly.
- Improve the quality of service: You can use the monitoring tool to track metrics such as meeting uptime and network bandwidth usage. This information can be used to identify areas where you can improve the quality of service for your Zoom users.
- Gathering insights: Zoom monitoring data offers insights into how an organization uses Zoom. This information will help improve Zoom deployment and usage, and identify improvement areas.
Overall, Zoom monitoring is an important tool for any organization that relies on Zoom for video communication. By monitoring Zoom performance and availability, organizations can ensure that their meetings and webinars are conducted smoothly and efficiently, and that participants have a positive experience.
Zoom’s built-in monitoring tool
Zoom’s built-in monitoring tool included in the statistics section provides a variety of data and metrics that track and analyze the performance and availability of Zoom meetings, webinars, and other video communication sessions. This data helps identify and resolve any issues that impact the quality of Zoom meetings and webinars, and improve the overall experience for participants.
To access Zoom’s built-in monitoring tool, go to the Settings page of your Zoom account and click on the Statistics tab. This tab will display a variety of data and metrics, including:
- Meeting uptime: The percentage of time that Zoom meetings were successfully running during the specified time period.
- Network bandwidth usage: The amount of network bandwidth that was used by Zoom meetings during the specified time period.
- Participant engagement: The average amount of time that participants spent in Zoom meetings during the specified time period.
- Device usage: The percentage of users who used different devices to access Zoom meetings during the specified time period.
- Meeting types: The percentage of meetings that were different types of meetings, such as one-on-one meetings, group meetings, and webinars.
Overall, Zoom’s built-in monitoring tool is a good tool that helps checking in real-time the quality of Zoom meetings. However, this utility doesn’t provide any historical data or computes any baseline, thus reducing its utility. As a result, the Zoom built-in monitoring utility is a resource for the end-user to troubleshoot issues ad-hoc. It doesn’t help IT organizations improve the overall performance and end-user experience, including capacity planning.
How to check the Zoom performance
Let’s walk through a troubleshooting procedure that can help you figure out what’s causing Zoom performance issues. Let’s assume that you are having difficulties hearing other participants. Here’s how you can troubleshoot audio/video problems by using the built-in tools included in your Zoom account:
- In the Zoom menu bar, click on Edit then go to Preferences
- In the Statistics section, select Audio (the video section reports the same metrics and behaves quite the same as voice).
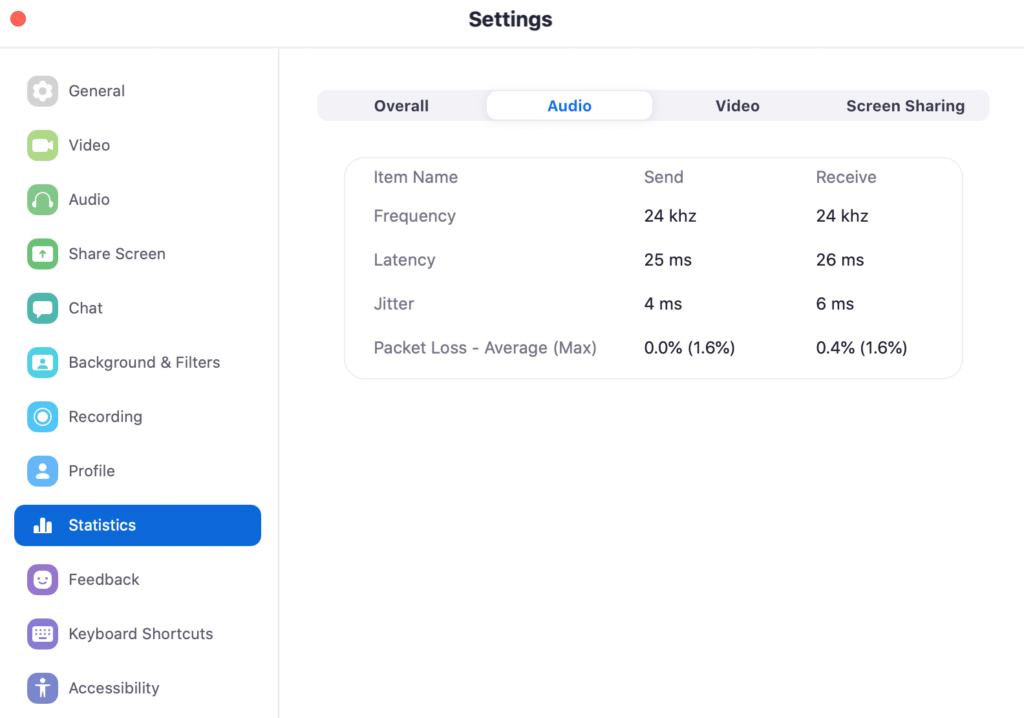
- Zoom provides real-time statistics for three key network performance metrics: latency, packet loss and jitter.
Identify a good Zoom video call
Here’s when I had a good call quality. You can note that for both sent and received traffic, the latency, jitter, and packet loss metrics are below the recommended thresholds.
Identify a bad Zoom video call
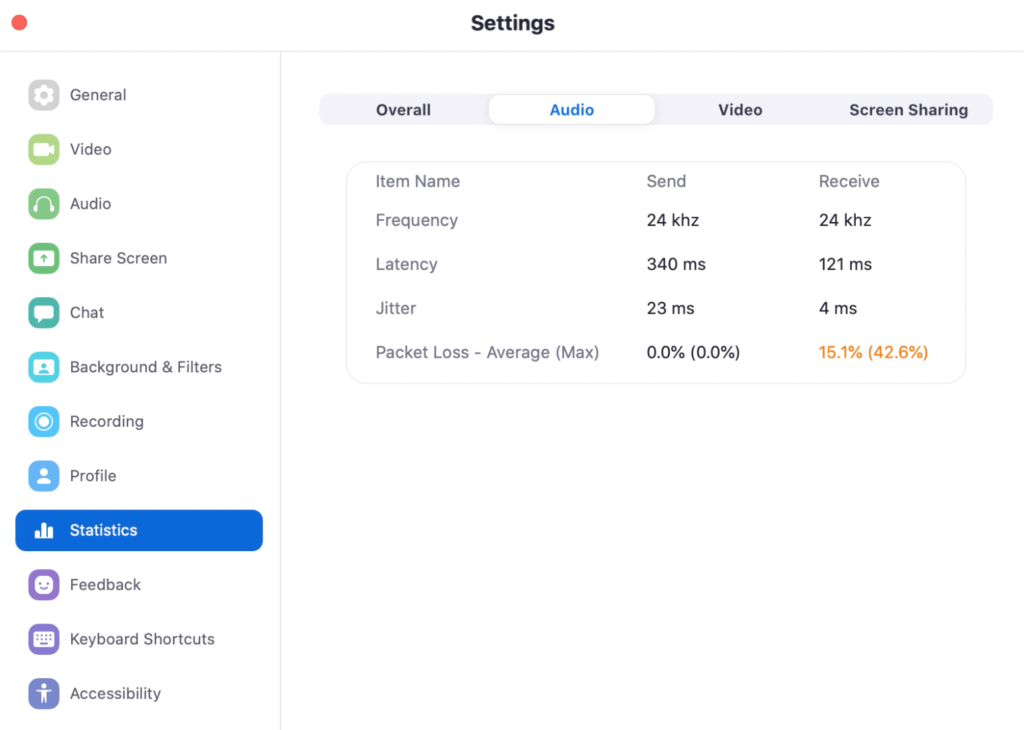
Here’s when I started experiencing a choppy call. You can see that the latency is high (more than 100 ms.) both at sending and receiving; there’s also high packet loss on the receive side (highlighted in orange). Participants confirmed that they had trouble hearing my voice.
Identify a terrible Zoom video call
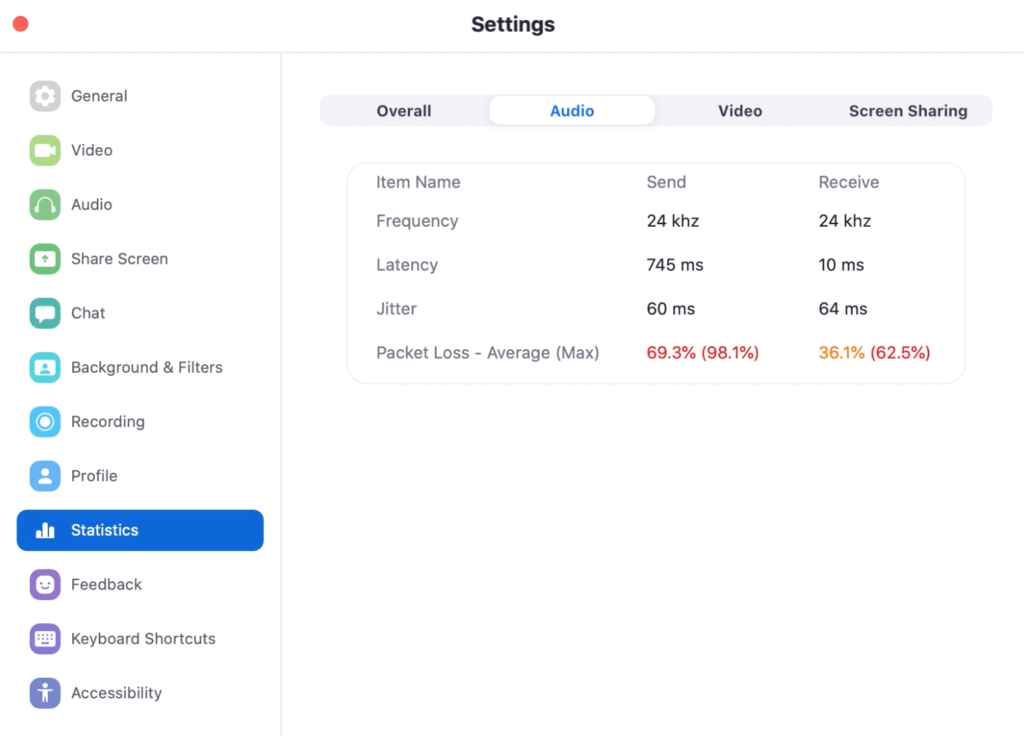
In this case, I could barely see and hear any voice on the other end. Latency is very high, so is jitters (above the recommended 30 ms.), and packet loss jumps to the roof.
Zoom built-in Network Connectivity Tool
The Zoom platform provides a built-in Network Connectivity Tool to test a client’s network performance, including the microphone and camera. This tool is accessible via the following keyboard shortcuts:
- Ctrl+Alt+Shift+D for Windows
- Cmd+Option+Shift+D for Mac
The tool provides two options: smart test and advanced test. The major difference is that in the smart test, they user doesn’t have to pre-fill any information. On the other end, in the advanced test, the user has to specify the destination host.

When the user runs a network test, the Network Connectivity Tool provides the following information:
- Displays network information about the client’s adapter, including private and public IP address
- Runs an MTR test against the Zoom servers
- Returns the status of the Zoom meeting and chat services

Third-party Zoom monitoring tools
As we mentioned above, Zoom’s built-in statistics and the Network Connectivity tool are a valuable tool for gathering real-time data about a specific meeting, or client’s performance. However, it doesn’t provide enough historical data to network operations teams to improve the overall performance and end-user experience of Zoom calls. That’s where a third-party tool like NetBeez adds value.
NetBeez helps you automatically collect in real-time all the information needed to identify what’s causing a degraded zoom experience, store it on a central server, and use that data for alerting, troubleshooting, and historical performance analysis. By tracking and analyzing Zoom performance and availability, organizations can collect real-time zoom performance data from all their users. They can verify that their users run meetings and webinars smoothly and efficiently, and that participants have an overall positive experience.
A simple guide to monitor Zoom
In this section, we will guide you through the simple process of monitoring Zoom with NetBeez. NetBeez provides a simple and effective way to monitor Zoom performance at scale. As an active network monitoring solution, NetBeez offers easy-to-deploy network agents and software clients to match the needs of organizations with a distributed workforce. In four simple steps, it’s possible to deploy network monitoring at remote branch offices, data centers, headquarters, and remote workers. You can start a free trial if you don’t have it.

Step 1 – Deploy network monitoring sensors
In this initial step, you’ll have to install the network monitoring agents. NetBeez provides two options:
- Network agents are hardware, virtual or software appliances that get installed on-premise at remote branch offices, public clouds, and data centers. The data collected by these units will help you understand what is the overall zoom performance globally or locally speaking. For instance, if all the agents find a performance issue with Zoom, that means it’s a problem within the Zoom cloud and network. On the other hand, if only one or a subset of these agents report issues, then it’s more a localized problem within the network where these agents are deployed.
- Remote worker agents are software clients for Windows or Mac operating systems. The data collected by these units will help you understand what is the Zoom experience of the user where the agent runs. Complementing this data with that from network agents will help you compare the end-user performance, and identify the root cause of end-user experience issues. Bottom line, these agents are vital to monitor the network of work from home and remote employees.
Consult the online documentation to see how you can install NetBeez agents. To conclude, get started with Zoom monitoring by deploying at least three network agents to have a global availability and performance view on Zoom. Then install remote worker agents on end-user laptops to capture all the performance metrics that are vital to track performance and experience.
Step 2 – Create a Zoom network monitoring target
Once you have deployed the agents, you can create network monitoring tests to Zoom. The NetBeez dashboard provides a simple way to do that by offering two Zoom target templates:
- The “Zoom Base URL” target provides DNS and web performance metrics against the zoom.us URL. This is the URL that every user needs to access to login to the Zoom service and also access web features and functionality.
- The “Zoom Meeting” target monitors the voice and video performance at the network layer. The configuration of this target requires the user to specify the default meeting URL assigned to the organization. If your organization didn’t purchase a dedicated meeting hostname, then the URL will look something like us06web.zoom.us.
Step 3 – Verify latency, packet loss, and jitter
Once the Zoom monitoring target is configured, the network network and remote worker clients will immediately start running availability and performance checks. In the following screenshot you can see the real-time data gathered by a remote end-user on a Windows laptop, including latency, packet loss, and jitter.
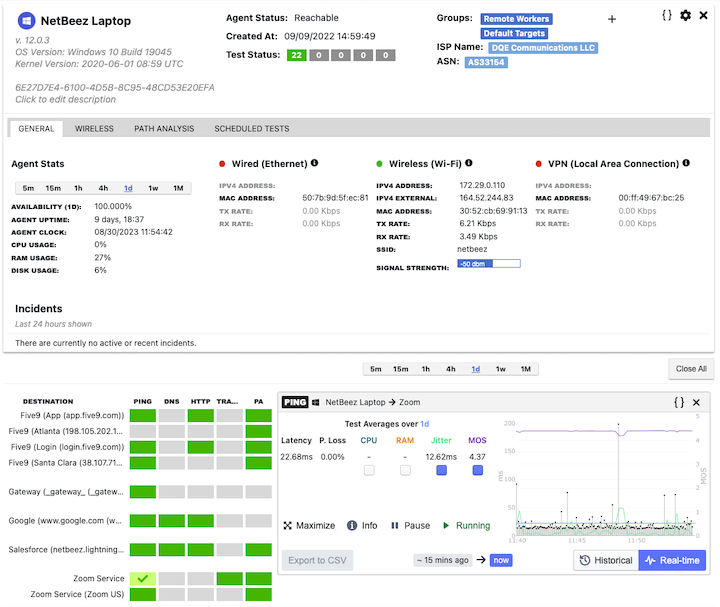
Along with that data, NetBeez also reports the following data from remote worker agents running on endpoints:
- Network interface information like reported in the Zoom Network Connectivity Tool
- The Mean Opinion Score (MOS) is a VoIP call quality index from 1 to 5; network and voice engineers check this metric to get a quick sense of the end-user experience.
- WiFi performance statistics to check if the wireless signal is good or there’s noise or overlapping networks in proximity.
- CPU utilization and RAM consumption to verify that the client has enough resources to run the Zoom application.
By monitoring Zoom performance and availability with NetBeez, organizations can ensure that their meetings and webinars run smoothly and efficiently, and that participants have a positive experience.
Step 4 – Setup email notification and other methods
The last important step of the configuration is to enable notifications when a Zoom performance issue occurs. By default, NetBeez generates alerts either when the service is not reachable or when there’s a Zoom performance issue. Notifications enable network administrators and support teams to get an email or a page when this happens.
NetBeez supports sending notifications via SMTP, SNMP, Syslog, webhooks as well as integrations with third-party systems such as ServiceNow, MS Teams, Slack, and PagerDuty.
To conclude, NetBeez provides richer data than the one available within the Zoom client and Network Connectivity Tool. Another important factor to consider is that NetBeez retains historical data, analyzing for trends and other anomalies that are crucial to proactively detect performance issues with Zoom, cutting troubleshooting time. Request a demo to learn more about how NetBeez enhances Zoom performance and support.
What is Zoom troubleshooting?
Zoom troubleshooting is the process of identifying and resolving problems that may occur when using Zoom. This can include a wide range of issues, such as:
- Problems joining meetings or webinars
- Audio or video problems
- Connection problems
- Problems sharing screens or other content
- Other technical problems
Zoom troubleshooting can be performed by the user themselves, or by an IT support professional. If neither option is able to find the root cause of the problem, it’s recommended to contact the Zoom support to verify if it’s something on the Zoom side.
How to troubleshoot Zoom problems, including “Your internet connection is unstable”
During a Zoom meeting or webinar it may happen that you can’t hear other participants speaking, or the video quality is low. Sometimes you could also get the message ”Your internet connection is unstable”. Chances are that your network connection is causing this problem.
Here are some tips for troubleshooting common Zoom problems:
- Check your network connection: Make sure that you have a stable internet connection with no packet loss, low latency (< 100 ms), and enough bandwidth (25+ Mbps download, 3+ Mbps upload). As we mentioned in the previous section on monitoring, you can self-diagnose with the Zoom built-in statistics reporting tool. You can also run commands to test packet loss and network speed test.
- Check your device resources: If you are running an old computer, make sure that you have enough resources. Voice and especially video calls with Zoom are pretty resource-intensive. To check your devices resources, open the Task Manager if you have Windows or the Activity Monitoring in Mac. Those tools help you verify how much is the CPU utilization and the RAM consumption. If your CPU utilization is consistently above 80%, then you should either close some applications, or use a different hardware.
- Restart your device: Sometimes devices that have a long uptime, can have processes that get stuck (zombie). In this case, restarting your computer or mobile device can often resolve minor Zoom problems.
- Update the Zoom app: Make sure that you are using the latest version of the Zoom app. Zoom releases updates regularly to fix bugs and improve performance.
- Check your audio and video settings: Make sure that your microphone and camera are properly configured. You may also need to adjust your audio and video settings within the Zoom app.
- Try troubleshooting the problem in a different browser: If you are using Zoom in a web browser, try using a different browser to see if the problem persists.
Zoom troubleshooting with NetBeez
In the following section we will review a step-by-step procedure that helps troubleshoot Zoom issues within the NetBeez dashboard. This procedure assumes that the following resources are present:
- 3+ network agents installed at different cloud regions to have a complete and reliable view on applications’ status and performance.
- Remote worker agents installed on end-user laptops and desktop to gather their digital experience to Zoom.
- Both Zoom targets have been configured and assigned to the NetBeez agents.
- The anomaly settings are properly configured, and the default performance alerts are assigned to the Zoom target.
Zoom troubleshooting procedure: Step 1
Login to the NetBeez dashboard and on the Buzz tab check if there’s an open incident with a Zoom target or with one or more agents. Here there are three possible outcomes:
- Zoom incident: If you see a target incident with Zoom, that means that somewhere in the Zoom cloud there are ongoing problems. You can cross verify the extent of the issue by checking the Zoom status dashboard at url (https://status.zoom.us/).
- Agent incident: One or more agents are having some sort of network performance issues related. Inspect each individual agent in the Agents tab to identify more the root cause.
- No target nor agent incident reported: If one or more users are complaining about Zoom experience issues, then go to the Agents tab to see what the root cause could be.
Zoom troubleshooting procedure: Step 2
In the Agents tab, locate the agent entry associated with the user that is having Zoom problems. In that page:
- In the General section, check the following items:
- Identify if tests against Zoom are triggering alerts (red for full failures and orange for performance issues).
- Click on the Zoom ping tests and verify that none of the following metrics deviate from the recommended values:
- Latency < 100 ms.
- packet loss < 2 %
- Jitter < 30 ms.
- MOS > 3.7
- Verify the CPU and RAM consumption on the endpoint, reported on the Zoom tests or in the top section of the page. If the CPU is consistently above 80-90%, then there’s a resource issue.
- In the Wireless section, verify if any of these wireless metrics are non optimal, indicating a possible wireless problem:
- Signal strength is less than -60 dBM
- Link quality is less than 90% (Windows)
- MCS is less than 6 (Mac OS)
- Run an SSID scan to verify that there aren’t too many wireless networks that use the same channel common to the user with problems.
- In the Scheduled Tests section, check the download and upload speed of the network speed test, and verify that the user has at least 25 Mbps of download and 3 Mbps of upload speed.
- In the Path Analysis section, check the Zoom tests don’t highlight a hop with latency higher than 100 ms (yellow dots) or 150 ms (red dots).
Best practices to ensure an optimal Zoom experience
Here we list some best practices for an optimal Zoom experience.
Use a wired Ethernet connection when possible
Use an Ethernet connection if possible instead of using the wireless network. If you connect with Ethernet, and you are still experiencing issues, then check with a speed test how fast your Internet is.
Test the Internet connection
If your only option is to connect via Wi-Fi then consider how distant you are from the WiFi router. In public spaces, generally wireless access points are hanging on the ceiling. Make sure that you are not too far away, and that there are no obstructions between the WAP and your laptop. Consider also using a WiFi extender, a mesh network, or high-powered/long range wireless solution. In case of home networks, make sure that there are no external Wi-Fi networks that are overlapping with your network.
Use the noise canceling headphones
Zoom users that attend meetings in public spaces such as airports, coffee shops, or trade shows, should consider enabling the background noise suppression option in their clients. If that’s not enough, or for some reason not supported, consider using noise canceling headphones to reduce ambient noise from crowded locations.
Test your Zoom connection before a meeting
Are you attending a very important Zoom meeting, perhaps a job interview, or a sales presentation with a key customer? Zoom provides a way to test your client and audio/video quality with a test session. Just go to the URL https://zoom.us/test and click the test button.
Avoid using video background and other effects
Zoom users running endpoints with limited resources should disable video effects to save resources. This includes virtual backgrounds, blur backgrounds, video filters, and avatars. Also when using a slow internet connection, video backgrounds and other effects can increase the amount of bandwidth required for Zoom, which can lead to performance problems.
When its’ recommended to record Zoom meetings on the cloud
Record Zoom meetings on the cloud when the recordings are shared with other participants, or saved for future use, such as for marketing purposes. Another reason to record Zoom sessions on the cloud is when you want to save endpoint resources. Recording on the computer is, in fact, adding more load to the local machine, so consider that.
Network optimization for Zoom performance
Zoom, like any other VoIP (Voice-over-IP) solution, requires network optimization in place to ensure a good performance. For this reason, performance metrics latency, jitter, and packet loss should fall into specific ranges.
- Bandwidth: ensure that each user has access to 25 Mbps in download and 3 Mbps in upload.
- Latency values should be below 150 milliseconds (ms). Higher latencies can cause noticeable delays and affect the conversational flow.
- Jitter should be kept below 30 ms. Jitter within this range ensures that the variation in packet arrival times is minimal, leading to smooth voice playback. Excessive jitter can result in audio disruptions if not properly managed.
- Packet Loss should be kept at 3% or lower otherwise it can cause voice distortion, choppiness, or gaps in the conversation.
To optimize a network’s configuration, organizations need to follow three simple rules:
- Plan for bandwidth – Under-provisioned circuits limit the quality of the Zoom calls being transported. Engineers need to ensure that the network can handle the planned call volume. Thing can be done by forecasting the number of concurrent calls that occur at peak time.
- Avoid network congestion – Even when circuits are correctly provisioned for capacity, network congestion could occur, causing Zoom traffic to be dropped. Without a Quality of Service (QoS) configuration applied to the network, all network traffic (voice and data) will be treated in the same way, causing Zoom performance degradation.
- Verify QoS settings – QoS is a network configuration setting that gets applied to any network device that VoIP traffic traverses. Typically, IP traffic marked with the Expedited Forwarding (EF) class Misconfiguration of QoS, including incorrect traffic marking, queuing, and prioritization, can cause improper handling of VoIP traffic. To ensure that Zoom traffic is correctly marked with the EF class, in the Zoom web portal verify that by going to Account Management > Account Setting > Meeting (Advanced) that DSCP marking is enabled.
Takeaways from monitoring and troubleshooting Zoom
The rise of remote work in 2020, made video conferencing and performance monitoring a necessity. Monitoring Zoom performance is vital for ensuring quality meetings and troubleshooting issues. Metrics like CPU usage, RAM consumption, packet loss, latency, and jitter are crucial. Zoom’s built-in tools offer real-time data, but third-party solutions like NetBeez provide deeper insights and historical data, aiding IT teams in optimizing user experience. Troubleshooting involves checking network stability, device resources, app updates, and audio/video configurations. NetBeez simplifies this process, offering a step-by-step Zoom troubleshooting procedure. If you want to try NetBeez, request a demo.


