Iperf reverse mode is a powerful feature that enables users to test network bandwidth in the opposite direction, from the server to the client. This is particularly useful when you need to measure the download bandwidth of a client machine that is behind a NAT or firewall.
With iperf, reverse mode is easy to use and supports both TCP and UDP tests, allowing you to evaluate network performance under different protocols. In this mode, the client initiates the test, but instead of sending data, it receives data from the server. This setup provides a clear picture of the client’s download capabilities and helps identify any bottlenecks or issues in the network path. Whether you’re troubleshooting network performance, configuring a new connection, or simply verifying bandwidth, iperf’s reverse mode is an essential tool for comprehensive network testing.
Iperf Reverse Option: versions 2 and 3
iPerf version 2 and 3 are currently maintained in parallel from two different teams. iPerf has been around for more than 15 years; iPerf 3 was created with the goal of a smaller and simpler code base, as well as offering a library for integrating with other code.
The two versions are incompatible with each other, and there are only a few differences in terms of the options and functionalities that they offer. In this post, I wanted to focus on a subtle difference that I often have to explain, even to network engineers that have been using iPerf for a while.
iPerf3 is actively maintained and supports multiple systems, including Linux, FreeBSD, and Windows, and installation typically involves downloading, compiling, and installing the software. After the code base and library improvements, throughput and bottleneck identification became more accurate, as multi-threading and support for multiple CPU cores in iPerf3 (since version 3.16) help address these issues. Earlier versions of iPerf3 were single-threaded, which could result in a performance gap compared to iPerf2, which is multi-threaded and can handle higher throughput. When reporting results, iPerf3 provides JSON output, and the output includes detailed metrics for performance analysis.
Regular iPerf Test
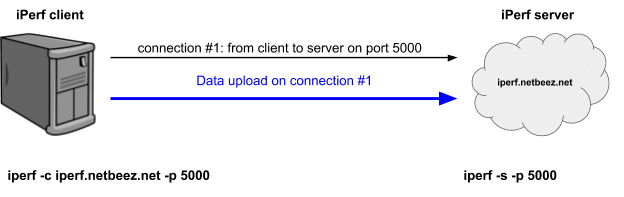
The client of an iPerf test is the host that sends data to the server, as depicted in this image:
The sequence of events is as follows:
- The server iperf.netbeez.net starts listening on port 5000 (iperf -s -p 5000)
- The client starts the test towards the server (iperf -c iperf.netbeez.net -p 5000)
- The server accepts the connection
- The client detects that the connection with the server is successful
- The client starts uploading data to the server
- The client finishes the data upload prints the results and exits
This sequence is common on both versions.
This setup measures upload speed from the client to the server. Both iPerf versions have the option to measure download speed by setting the appropriate flag.
On version 2 the flag is “-r” and on version 3 it’s “-R”. However, the name of the option is not the only difference – let’s see how they differ.
Iperf2 Reverse
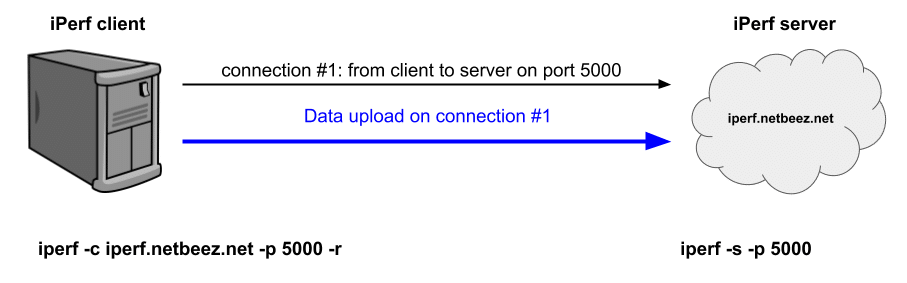
When you give the “-r” option there are two steps for the test:
Step 1: The client runs an upload speed exactly as described in the previous section:
Step 2: The server initiates a connection towards the client and uploads the test data
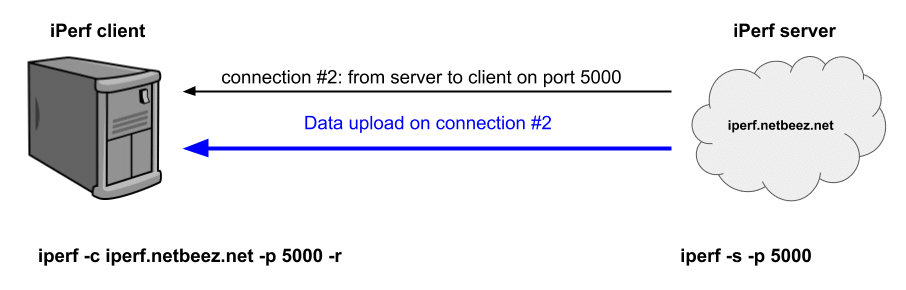
The problem with this implementation is that the host that initiates the test (iPerf client) needs to be accessible from the server in order to accept the new connection and receive the traffic. In many cases, this may not be possible. For example, if the client is NAT’ed or, if there are firewall rules that prevent incoming connections, then the reverse iPerf version 2 test fails.
Iperf3 Reverse
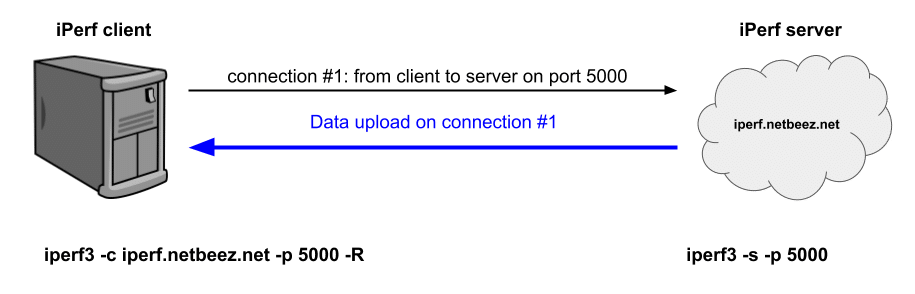
When you give the “-R” option to iPerf 3 then the test runs as follows:
The sequence of events is as follows:
- The server iperf.netbeez.net starts listening on port 5000 (iperf3 -s -p 5000)
- The client starts the test towards the server (iperf3 -c iperf.netbeez.net -p 5000 -R)
- The server accepts the connection
- The server starts uploading data to the client
- The server finishes the data upload and the client prints the results and exits
The subtle difference here is that the server uses the already established connection from the client to upload the data. This setup doesn’t have the problem that version 2 has, where the test fails if the client can’t accept the connection from the server.
Obviously, the version 3 reverse option is preferable for this reason. This gives you the option to run an upload and download test from and to the client without any restrictions.