In this article I would like to present a simple setup that allows you to interconnect a local area network to a Virtual Private Cloud (VPC) hosted on Amazon Web Services (AWS) with a private VPN tunnel. The tunneling technology used is OpenVPN. To implement this configuration you will need:
- One Amazon Web Services account (you can create one here)
- One Linux server running Debian or Ubuntu on your LAN
- One internet connection
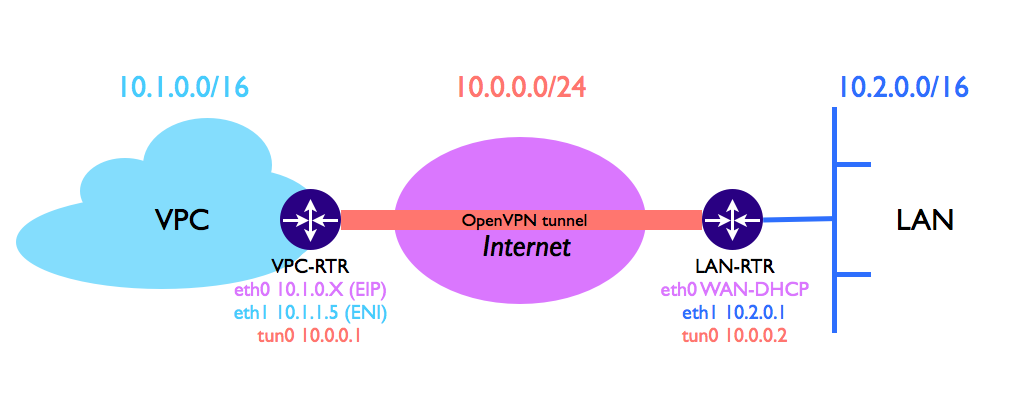
At the end of this how-to you will be able to extend your local area network (LAN) to a virtual private cloud and interconnect your internal systems with your Amazon cloud instances. The end result should look like this:
Here are more detailed descriptions of the components:
Virtual Private Cloud – All the Amazon instances launched inside the VPC will get an address from the 10.1.0.0/16 pool. Inside the VPC, a Linux instance (VPC-RTR) will be configured as VPN endpoint that will receive and route across the VPN tunnel all the traffic destined for the 10.2.0.0/16 physical network.
OpenVPN tunnel – The tunnel is established across the Internet between the Linux instance on AWS and the physical server (LAN-RTR) installed on your LAN.
Local Area Network – Inside the LAN, a Linux server (LAN-RTR) will be configured as VPN endpoint that will receive and route across the VPN tunnel all the traffic destined for the 10.1.0.0/16 virtual network.
Configuring Amazon Virtual Private Cloud
At the end of this procedure we have the VPC configured this way:
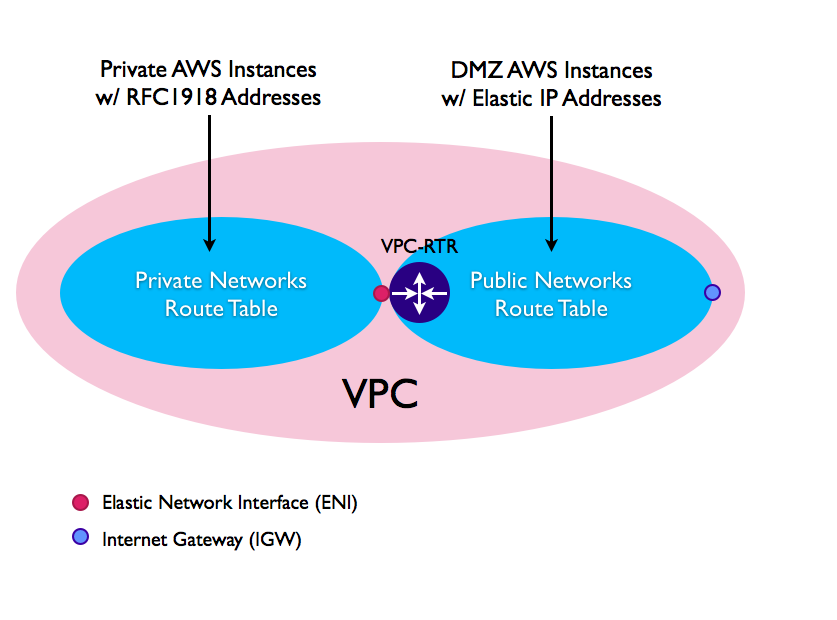
Here are some more details about this setup:
- Public Networks Route Table – This is the DMZ route table where the VPC-RTR has its primary network interface (eth0). Instances within this route table will be reachable from the Internet via the IGW interface if an Elastic IP address is assigned to them. The VPN tunnel will not route traffic originating from this portion of the network. During this procedure will create one subnet, 10.1.0.0/24, which will be assigned to this route table.
- Private Networks Route Table – This is the private route table where the VPC-RTR has its secondary network interface (eth1/ENI). The default gateway of this subnet is the VPC-RTR’s eth1 interface (ENI). Instances within this route table will not be reachable from the Internet. The VPN tunnel will route traffic originating from this portion of the network. We will create one subnet, 10.1.1.0/24, which will be assigned to this route table.
VPC Configuration: A Step-by-Step Guide
Here are the steps for configuring a VPC to support the setup illustrated:
- Log in to the AWS main console and select VPC
- In the VPC console, go to “Your VPCs” and create a new VPC and select the CIDR block that will be assigned to this VPC (e.g. 10.1.0.0/16)
- Go to Subnets and create two new subnets:
- A public one (e.g. 10.1.0.0/24) where the VPC-RTR and other DMZ instances will be launched
- A private one (e.g. 10.1.1.0/24) where internal instances will be launched
- Go to Internet Gateways, create a new one and attach it to the VPC created in (2)
- Now switch to the EC2 console, from the top left “Service” menu
- In the EC2 console go to the “Network Interfaces” under the “NETWORK & SECURITY” entry and create a new network interface selecting the private subnet created in (3.2), assigning it a fixed private IP (e.g. 10.1.1.5), and leaving the default security group preselected
- In the EC2 console go to “Instances” under the “INSTANCES” entry and launch a new Linux instance with the following settings:
- AMI: Choose the Ubuntu 14.04 or your preferred Linux flavor
- Instance Type: Chose a t2.micro or larger if needed
- Make sure to select the following options:
- Network: Select the VPC created in (2)
- Subnet: Select the public subnet created at (3.1)
- Network Interfaces: Leave eth0 as is, and add a secondary network interface eth1 (“Add Device”); here select the network interface created in (6) and select to the private subnet created in (3.2)
- Storage: Leave the default options or select based on your requirements
- Tag Instance: Leave the default options or select based on your requirements
- Security Group: Leave the default options or select based on your requirements
- Go to Elastic IP, allocate a new address, and associate it to the network interface created in (6)
- Switch back the VPC console, go to the “Route Tables” entry and:
- Select the default route table that was automatically created when you created the VPC in (2): This is the public route table associated to all the DMZ instances that will have Elastic IP addresses assigned. Perform the following actions:
- In the “Subnet Associations” tab select the public subnet (e.g. 10.1.0.0/24) created in (3.1)
- In the “Routes” tab add the default route (0.0.0.0/0) and select as target the Internet Gateway created in (4)
- Create a new Route Table: This route table will be assigned to all the private instances that will be routed by our VPC-RTR. Perform the following actions:
- In the “Subnet Associations” tab select the private subnet (e.g. 10.1.1.0/24) created at (3.2)
- In the “Routes” tab add the default route (0.0.0.0/0) and insert as target the network interface created at (6)
- Select the default route table that was automatically created when you created the VPC in (2): This is the public route table associated to all the DMZ instances that will have Elastic IP addresses assigned. Perform the following actions:
Configure OpenVPN to establish an encrypted tunnel
In this section I will provide a quick overview about how to configure the two OpenVPN endpoints, VPC-RTR and LAN-RTR, to establish an encrypted tunnel. Alternatively, you can follow the instructions available here on OpenVPN’s official website.
In this example, the VPC-RTR host is configured as a server while the LAN-RTR is the client. Below are the OpenVPN configuration files for the two endpoints:
VPC-RTR (Client)
daemon
dev tun
port 125
ifconfig 10.00.0.1 10.00.0.2
secret /etc/openvpn/static-key.key
comp-lzo
keepalive 10 60
ping-timer-rem
persist-tun
persist-key
script-security 2
log /var/log/openvpn.log
push "route 10.2.0.0 255.255.0.0"
up /etc/openvpn/up-script.sh
Content of the /etc/openvpn/up-script.sh file
#!/bin/sh
/sbin/route add -net 10.1.1.0/24 gw 10.0.0.2
LAN-RTR (Client)
remote <ELASTIC_IP_ADDRESS> 125
daemon
dev tun
ifconfig 10.0.0.2 10.0.0.1
secret /etc/openvpn/secret-key.key
log /var/log/openvpn.log
comp-lzo
keepalive 10 60
ping-timer-rem
persist-tun
persist-key
script-security 2
up /etc/openvpn/up-script.sh
Content of the /etc/openvpn/up-script.sh file
#!/bin/sh
/sbin/route add -net 10.2.0.0/16 gw 10.0.0.1
IPv4 forwarding has to be enabled on both VPN endpoints by editing the /etc/sysctl.conf file and setting the following option to 1:
net.ipv4.ip_forward=1
Any workstation connected to your LAN should be configured to send to the physical Linux (LAN-RTR) all traffic destined to 10.1.0.0/16 networks.
Conclusion
I hope that this blog post was beneficial to familiarize with Virtual Private Cloud networks. If you want to learn how to monitor performance between on-premises and cloud environment, check out the hybrid-cloud network monitoring solution by NetBeez.