AccessAgility is a technology company that offers mainly services and tools around WiFi technologies. One of their offerings is WiFi Scanner. It is a WiFi discovery and scanning tool for IT professionals for detailed information about surrounding WiFi networks. It’s supported on Windows and MacOS and provides information such as available SSIDs with their signal strength, channel width, BSSID, protocol, etc.
WiFi Scanner
You can download the software from the vendor’s website, and install it on your Windows or Mac machine. For the purposes of this integration, you can use the free trial or buy a subscription.
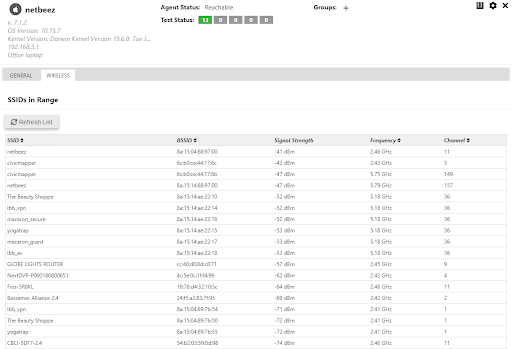
When you fire up WiFi Scanner, it uses the WiFi interface of the host it’s running on, and provides an output of the WiFi networks it can detect through the local interface. It looks like this:

In the background, the software captures the traffic through the wireless interface and compiles and displays the results in an intuitive way. One of the recent additions of WiFi scanner is the ability to use as a capturing device a remote host such as a Raspberry Pi or WLAN Pi.
NetBeez agents natively have the ability to scan and display the information on the NetBeez dashboard, but they don’t provide the wealth of information WiFi Scanner does.
Enabling Remote Capture on the NetBeez Agent
Since the NetBeez WiFi wireless agents are based on the Raspberry Pi platform, extending the scanning capabilities of WiFi scanner to NetBeez agents is pretty much straightforward. However, at the moment requires some manual steps to modify our existing agent to make it compatible with WiFi Scanner’s integration.
The NetBeez agent is shipped to our customers as a preconfigured box that just needs to be plugged into the network. After that point, all the agent management, such as connecting it to a WiFi network or starting active monitoring tests (e.g. latency, DNS, speed test) is done through the dashboard.
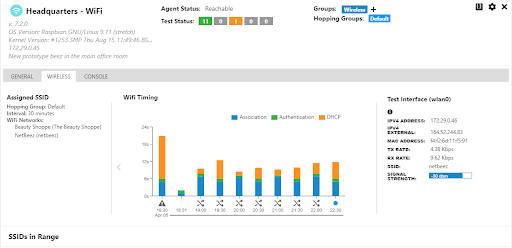
This is how an agent installed at our office in Pittsburgh, PA looks like connected to our office SSID “netbeez”.
Procedure for remote WiFi scanning
Here are the steps to set the agent up for remote WiFi scanning.
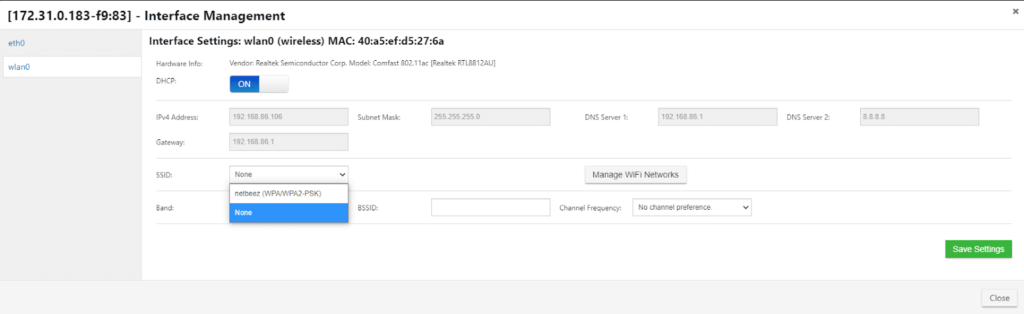
1) Disconnect the agent from any WiFi networks: During scanning, the interface needs to be dissociated from any WiFi network. Otherwise, the agent’s background process might compete with WiFi Scanner and cause the agent to reboot or not work properly during scanning. This is done by following “Agent setting -> Interface Management -> wlan0 -> None -> Save settings”.
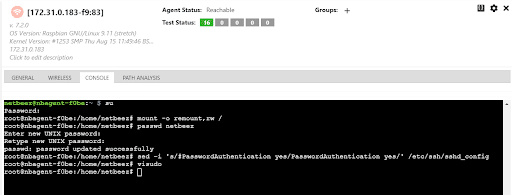
Since the agents are Linux-based boxes, we also provide a GUI console on the dashboard, which you can use to perform the following steps. Keep in mind that you need root access to the agent’s CLI. If you don’t have your agent’s root password contact out support team to get the credentials.
2) Become root with su: The following options require root access to modify options and files on the agent.
3) mount -o remount,rw / : The root partition of the agent is mounted as read-only to extend the SD card’s life span. To perform any changes on the agent, you first need to remount the root partition as read-write.
4) passwd netbeez: The agent is shipped with a custom password, and in order to be able to ssh to the agent with a password, you need to modify it to something other than the default one.
5) sed -i 's/#PasswordAuthentication yes/PasswordAuthentication yes/' /etc/ssh/sshd_config: The agents are shipped with password-based ssh disabled (you can ssh with a key and passphrase). At the moment WiFi Scanner needs to ssh to the remote host with a password-based ssh, and to enable that you need to modify the ssh configuration file.
6) systemctl restart ssh: After you modify the ssh configuration file, you need to restart the demon for the change to take effect.
7) visudo: use visudo to modify /etc/sudoers and add the following at the end of the file:
#link up/down

netbeez ALL=(ALL) NOPASSWD: /sbin/ip

#monitor mode and channel change

netbeez ALL=(ALL) NOPASSWD: /sbin/iw
Adding Remote Capture
In the background, WiFi scanner runs the command on the remote agent through ssh. One feature I like about WiFi scanner is that it allows you to first test that the remote capturing devices have been set up correctly. To do that click the plus sign on the upper right corner of WiFi Scanner and then click on “Remote WiFi Scanner.” Then configure it as shown in the following image and hit “Test Configuration.”
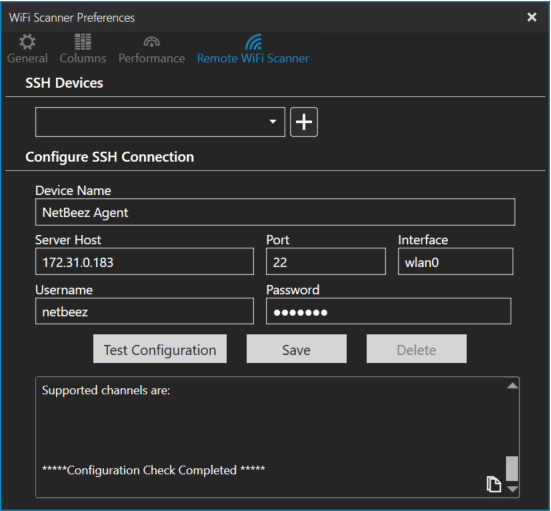
If at the end you see a successful message, it means your NetBeez agent has been configured correctly, and you can save this profile by giving a name and clicking the “Save.” button.
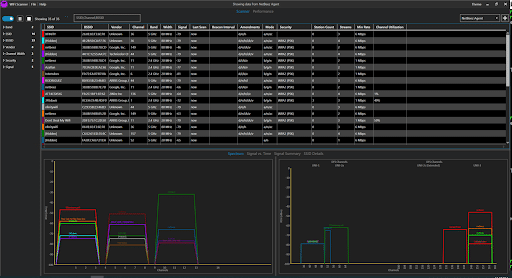
Once it’s saved, click on the drop-down on the upper right corner next to the plus sign of WiFi Scanner, and from there chose the device name you just created and let WiFi scanner do the rest (if the newly created device doesn’t show up you might need to restart WiFi Scanner):
Of course, for WiFi Scanner to be able to ssh to the agent and run the necessary commands, the machine you are running WiFi Scanner on needs to have a route to the agent, and port 22 has to be open.
If you have several NetBeez agents deployed, you can configure them to be compatible with WiFi Scanner and connect to them to get scanning information remotely, as if you are physically located where the agents are.